INTRODUCTION
The IR-LOCK Sensor system is used to autonomously land copters in small areas. Simply place the MarkOne Beacon at the desired landing point, and initiate the LAND mode. This is useful for docking with charging stations, package delivery systems, UAV-to-ground vehicle interaction, etc. The MarkOne Beacon can be reliably detected in any lighting condition (even complete darkness).
The original APM:Copter (Ardupilot) documentation can be found here. However, connecting the IR-LOCK Sensor to SOLO requires a bit more work than the typical Pixhawk connection, so this documentation describes the necessary steps.
1. CONNECT SENSOR TO SOLO
The IR-LOCK Sensor pin-out diagram is shown below. Also, the original Pixhawk flight controller is shown, which is NOT the same flight controller included in SOLO.
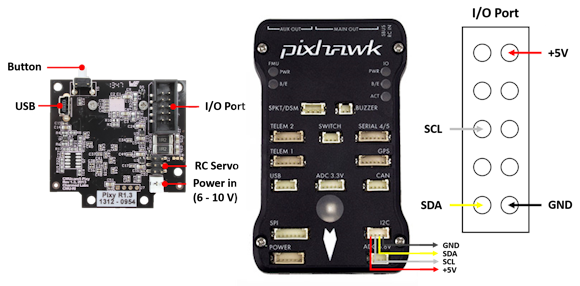
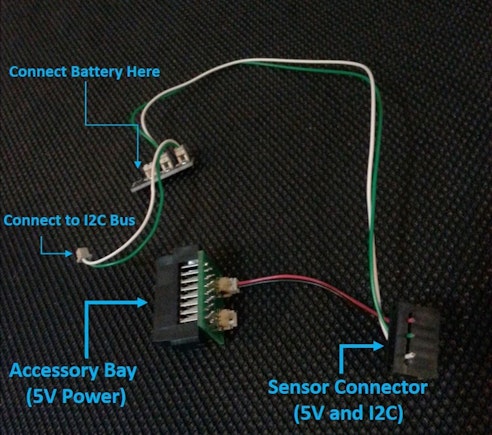
POWER: The IR-LOCK Sensor can be powered with a standard 5V input, which can come from the SOLO accessory bay. You can read more about the SOLO accessory bay here and here.
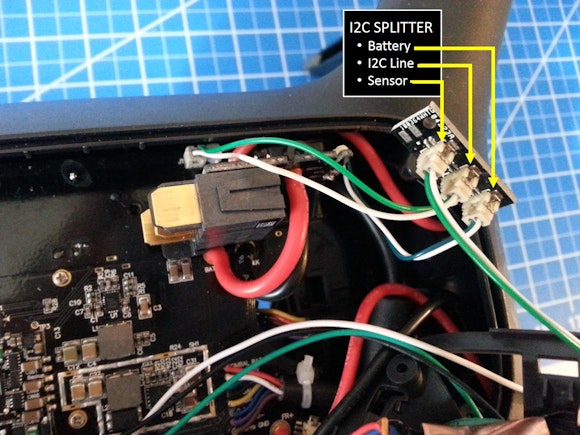
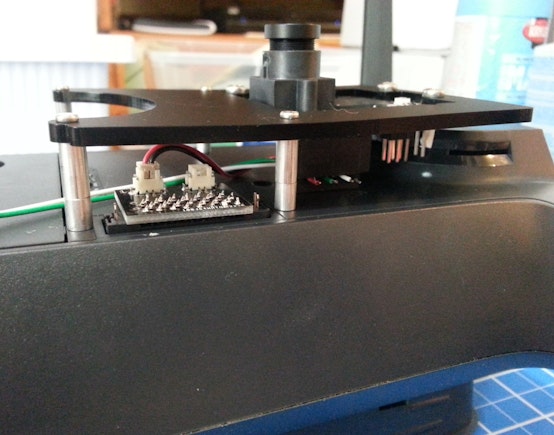
DATA: The sensor communicates with SOLO via I2C. Unfortunately, I2C pins (SCL/SDA) are not exposed in the SOLO accessory bay. Thus, the sensor should be plugged into the I2C bus that is used by the SOLO battery. The SOLO battery and IR-LOCK Sensor can operate simultaneously on the same I2C bus.
You will need to remove the SOLO battery tray (see steps 4 and 5 in the SOLO Teardown).
The image below shows an example of a plug-and-play cable assembly which connects the 5V and I2C lines.
2. MOUNTING SENSOR TO SOLO
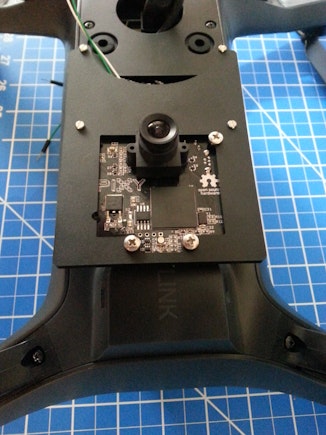
The IR-LOCK Sensor should be mounted with the lens pointed downward toward the ground. It is important for the sensor to be level with SOLO
NOTE: Before mounting the sensor, you will need to setup your sensor (i.e., upload sensor firmware, and adjust lens). Those instructions are included here.
3. UPLOAD SOLO FIRMWARE
Upload this modified version of the SOLO firmware (linked below). Instructions for uploading firmware to SOLO can be found here.
Firmware: ArduCopter-v2_correctedi2cbus.px4
The parameters enabling the precision landing feature are hard-coded in this modified firmware. You do not need to make further parameter modifications.
The source code is linked at the bottom of this tutorial. Note that the correct branch is ‘irlock01’.
4. FIRST FLIGHT
Use the video below to plan your first precision landing flight. Simply fly over the IR Marker, and then initiate an automated landing by pressing-and-holding the FLY button.
If the sensor does not ‘see’ the IR Marker, then SOLO should land in its current location (as normal)…. If SOLO is not responding to the IR Marker during landing, then the system will require troubleshooting. There could be a sensor connection issue.
Components and supplies
 |
|
× | 1 | |||
|
× | 1 | ||||
|
× | 1 | ||||
|
× | 1 | ||||
|
× | 1 |